Serial analog sensor

three minutes reading time
  • How-To
Comments

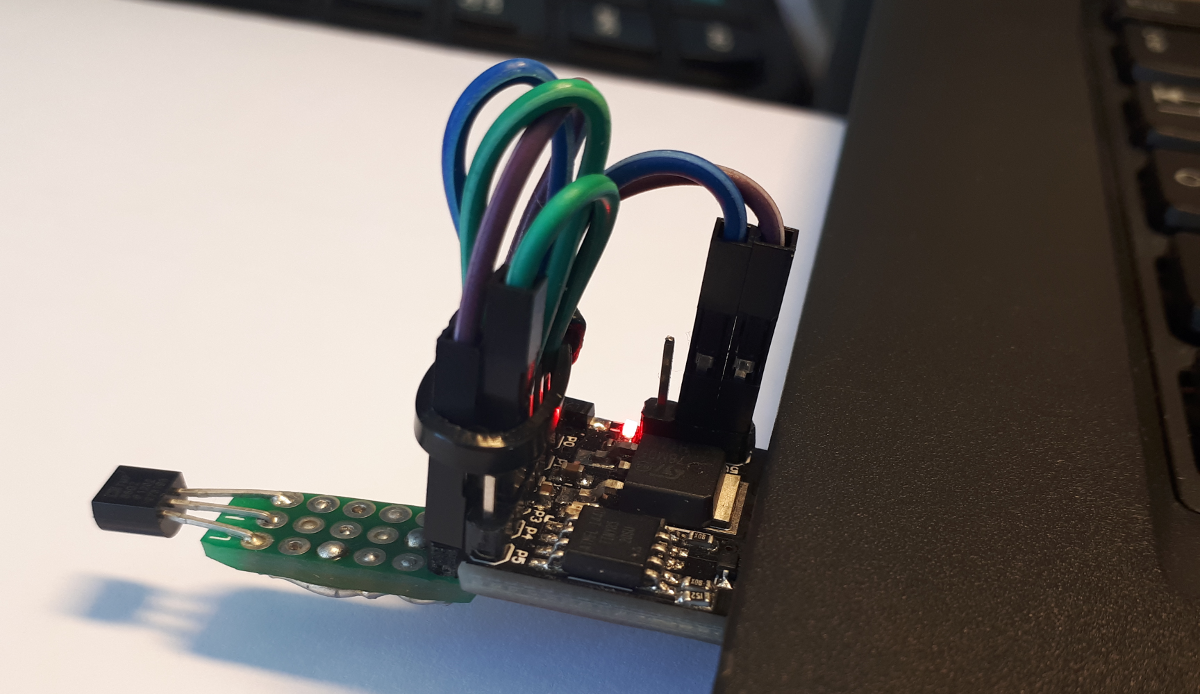
This blog post is about building a super simple analog sensor for Home Assistant. The physical sensor will send the data over its virtual serial port as it will be connected over USB. The concept is similar to the TEMPer USB devices. The attatched sensor type to the microcontroller can be any kind of sensor which gives you an analog signal from brightness over soil moisture to temperature.

The microcontroller will only transfer the voltage of an analog input pin which will be between 0 and 1024. Home Assistant will use the new serial sensor platform to read the data and perform actions to convert the raw reading into a real measurement. This means that you don’t have to adjust the code of your microcontroller if you change the attached sensor type.

The assembled sensor

Read on →

0.56: Skybell, Google Assistant, Travis CI and Toon

15 minutes reading time
  • Release-Notes
Comments

We reached another milestone aka number: 10000. GitHub is assigning numbers to pull requests and issues and the “10000” is a PR. Our ratio is around 1/3 issues and 2/3 pull requests. To be more precise: 64% pull requests and 36% issues.

If you haven’t noticed, there is now a glossary that collects some Home Assistant relevant terms. Talking about the documentation: @DubhAd rewrote large parts of the Z-Wave section. More structure to get started and to find details during the setup and the configuration.

Google Assistant / Google Home integration

This release includes a new component to integrate Home Assistant with Google Assistant by Phil Kates. We integrate via the Smart Home API, this means that you will be able to control your devices in Home Assistant via any device that has Google Assistant. Learn more in the documentation.

Hacktoberfest

Hacktoberfest is still on and so far we have received a lot improvements. We can’t make any promises to review everything by the end of October, but we are trying to make sure that you will get your t-shirt.

Map

The map is now its own component. Similar to configuration (config:), it will not show up without adding it to your configuration.yaml file.

map:

Travis CI

Why not observe your Travis CI jobs with Home Assistant? @tchellomello created a Travis CI sensor which allows one to check on the current state of Travis jobs. Now you can make sure that the coffee is ready when the build passed.

New Platforms

0.56.1 - October 22

0.56.2 - October 23

If you need help…

…don’t hesitate to use our very active forums or join us for a little chat. The release notes have comments enabled but it’s preferred if you use the former communication channels. Thanks.

Reporting Issues

Experiencing issues introduced by this release? Please report them in our issue tracker. Make sure to fill in all fields of the issue template.

Read on →


Templates, dates and times

two minutes reading time
  • Community
Comments

This Pull Request shows in a clear way what happens if the documentation is not as good as it should be. In short, it’s about Templating and how people start to think about creative ways to solve it if it’s not documented. Let’s assume that we want the current year. There are a couple of options available to do that:

Read on →

0.55: Tibber, DuckDNS, The Things Network, Owntrack

12 minutes reading time
  • Release-Notes
Comments

Beside the improved Wink support which was contributed by @w1ll1am23, ships this release a wide variety of new components and platforms. The input_slider components has received a makeover by @BioSehnsucht and is now input_number. @tinloaf added a feature that allows you to enter dates: input_datetime. Both will help you to improve your automation rules.

DuckDNS

Using Home Assistant with DuckDNS for Dynamic DNS (DDNS or DynDNS) is an old story. DuckDNS is also integrated in Hass.io. 0.55 ships a component for non Hass.io users to get a similar feature.

Recorder

The purging of data was improved. With purge_interval you can schedule regular purges of older events and states. In combination you can specify with purge_keep_days the amount of days you want to keep. The new service recorder.purge allows you to handle this task when needed.

Owntracks

Owntracks is an easy way to track your devices. For some times we have the device tracker which depends on MQTT but thanks to a new feature in Owntracks we can now offer support for HTTP. The new platform doesn’t require a MQTT broker but sends messages directly as HTTP requests to Home Assistant.

Tibber

This release introduces a new sensor: Tibber. The sensor provides the current electricity price if you are a Tibber customer. This will allow you to make automation for turning off the heater when the electricity price is high or only charge your electric car when the prices are low. We further plan to add support for showing future electricity prices and historic electricity consumption data. Tibber is currently only available in Norway and Sweden

The Things Network

The Things Network (TTN) is a LoRaWAN based network especially designed for IoT devices. With this integration one can observe the state of devices which are out of range of the local WiFi network as long as they are connected to a TTN gateway.

New Platforms

0.55.1 - October 15

If you need help…

…don’t hesitate to use our very active forums or join us for a little chat. The release notes have comments enabled but it’s preferred if you use the former communication channels. Thanks.

Reporting Issues

Experiencing issues introduced by this release? Please report them in our issue tracker. Make sure to fill in all fields of the issue template.

Read on →

Deprecating Python 3.4 support

1 minute reading time
  • Technology
Comments

Update February 16, 2018: Home Assistant 0.64 will be the last release to support Python 3.4. Starting with release 0.65, Home Assistant will require a minimum version of Python 3.5.3.


Starting with our next release, 0.55, we will deprecate Python 3.4 support. The current plan is to remove support for Python 3.4 at the beginning of 2018.

Python 3.5 was released on September 13th, 2015. It has since then become the default Python installation on the stable releases of Debian, Ubuntu, Raspbian and Hassbian. Our other own operating system, Hass.io, is more advanced and is already running the greatly improved Python 3.6.

The jump to Python 3.5 as a minimum version is driven by the Home Assistant core, which is based on asyncio. Starting with Python 3.5, asyncio got improved support in the language with dedicated keywords async and await. As this is the proper way of doing async in Python, we’re seeing a move by async libraries to either only support the new syntax from the beginning or dropping support for the Python 3.4 approach. Not moving along means an increased maintenance burden as we cannot use the latest releases of our libraries. Next to that it will prevent our users from being able to leverage the bug fixes and performance improvements that come with Python 3.5.

Hass.io

If you’re running Hass.io, you don’t have to do anything. Your system will always stay up to date.

Hassbian

If you’re running Hassbian it’s recommended that you make a backup of your configuration files and restore them on a fresh install. Upgrading an existing installation isn’t recommended.

Windows

If you’re on Windows, you’re fine as our minimum version for Windows has been 3.5 for a while now.

Other Debian based systems

If you’re running a Debian based system, follow these instructions to upgrade.


Participating in Hacktoberfest

1 minute reading time
  • Community
Comments

For the second year in a row, Home Assistant will be participating in Hacktoberfest. Hacktoberfest is an event organized by DigitalOcean and GitHub to support and celebrate open source. The idea is that open source projects like Home Assistant will gather a bunch of entry-level bugs, features, and documentation enhancements and that you, a current or future contributor, will help us fix them. If you submit four pull-requests during October, you will have earned yourself a limited edition Hacktoberfest T-shirt!

Why contribute to Home Assistant?

  • Written in Python 3 with 94% test coverage
  • Active and helpful community
  • Friendly to new contributors

Resources to get started:

Are you not a programmer but still want to contribute to Home Assistant? Check out our list of entry-level issues for the Home Assistant website.

Our participation for Hacktoberfest 2016 was a huge success. Join us to repeat it this year.

Hacktober fest logo


Effortless encryption with Let's Encrypt and DuckDNS

two minutes reading time
  • How-To
Comments

When Let’s Encrypt launched we were estatic: finally an easy and free way for our users to securely access their homes remotely. Let’s Encrypt signifianctly lowered the bar to get and renew SSL certificates. However, this process could still be quite an obstacle for our users. It required opening ports on the router and remembering to renew the certificate every so often.

Thanks to a blog post by Andreas Gohr I realized that DuckDNS supports setting TXT records, making it compatible with the DNS-01 challenge of Let’s Encrypt. The DNS-01 challenge is using the DNS record of the domain instead of interacting with the server. This means that it’s not needed for the user to open any ports!

I have worked together with Pascal Vizeli on updating the DuckDNS add-on for Hass.io and today we’re proud to announce it now includes automatic generation and updating of Let’s Encrypt certificates for your DuckDNS domain. The only thing that you have to add to your DuckDNS configuration is that you accept the Let’s Encrypt terms of service and point Home Assistant at the generated certificates and you’re good to go. No other work is required.

To get started today, start with making sure that you have Hass.io installed. After that, go to the Hass.io panel in Home Assistant, open the add-on store, scroll down to DuckDNS and install it. In the DuckDNS settings change “accept_terms” to true and start it.

Next up is to configure Home Assistant with the config below and restart it. You’re now good to go! Make sure to use the right protocol when browsing to your instance: https://<your_domain>.duckdns.org. Happy secure controlling your house!

# Example configuration.yaml entry for the HTTP component
http:
  ssl_certificate: /ssl/fullchain.pem
  ssl_key: /ssl/privkey.pem

If you’re not using Hass.io, check out the blog post by Andreas for instructions.

If you enjoy the free service provided by DuckDNS and Let’s Encrypt, consider donating to their cause:

More information:


Improved Hass.io build system

two minutes reading time
  • Technology
Comments

This is going to be a technical post for Hass.io add-on developers and people that run locally build add-ons (not the default).

Two months ago we introduced Hass.io, allowing our users to easily install, update and manage their Home Assistant installation. In this short time we’ve seen great adoption from the community. Around 20% of our users are choosing Hass.io as their method of running Home Assistant today. We’ve also seen many add-ons being made available on the forums. There are currently 14 reposities full of add-ons being shared!

Hass.io is built on top of Docker, a container runtime. One thing that Docker did not support was dynamic build environements. That was annoying for Hass.io because by supporting multiple CPU architectures, that was exactly what we needed! Luckily this feature has been added in Docker 17.05. By moving to Docker 17.05 as the minimum supported version we will be able to replace our templated Dockerfile approach with standard Dockerfiles that work out of the box. Thanks to Frenck for notifying us of this new build feature.

This change only impacts people that build add-ons or use add-ons that are built locally. You can check if your add-on is building locally on the detail page of add-ons.

If you are an add-on developer, read the documentation on how to publish your add-ons to Docker Hub. This will greatly improve the user experience.

Template changes

As an add-on developer, you will only have to change one line in your template to make it compatible with the new system. If you wish, you can also change the default build options for your image using the new build.json file.

Old:

FROM %%BASE_IMAGE%%

New:

ARG BUILD_FROM
FROM $BUILD_FROM

When

The new system will become active with Hass.io 0.64 and Host OS 1.1. Host OS 1.1 is available today. Navigate to Advanced Settings in the Hass.io panel to start the OTA update.

We have also updated our build scripts and replaced it with a builder docker engine. This builder makes deploying Hass.io components very easy. All basic functionality is supported. If you want more functionality, check out the builder by the Community Hass.io Add-ons project.