ISY994 Controller
The ISY994 is a home automation controller that is capable of controlling Insteon and X10 devices. Some models of the ISY994 can even control Z-Wave devices. The ISY994 controller is manufactured by Universal Devices.
Basic Configuration
Home Assistant is capable of communicating with any binary sensor, cover, fan, light, lock, sensor and switch that is configured on the controller. Using the programs on the controller, custom binary sensors, cover, fan, lock, and switches can also be created.
To integrate your ISY994 controller with Home Assistant, add the following section to your configuration.yaml file:
# Example configuration.yaml entry
isy994:
  host: ISY_ADDRESS
  username: ISY_USERNAME
  password: ISY_PASSWORD
Configuration variables:
- host (Required): The host entry should be in full URL format, eg. http://192.168.10.100:80
- username (Required): The username that used to access the ISY interface.
- password (Required): The password that used to access the ISY interface.
- sensor_string (Optional): This is the string that is used to identify which devices are to be assumed to be sensors instead of lights of switches. By default, this string is ‘sensor’. If this string is found in the device name or folder, Home Assistant will assume it is as a sensor or binary sensor (if the device has on/off or true/false states). This is only necessary for nodes that are not automatically detected as sensors by Home Assistant. Insteon door, window, motion and leak sensors should all be detected automatically.
- ignore_string (Optional): Any devices that contain this string in their name (or folder path) will be ignored by Home Assistant. They will not become entities at all. The default value is
{IGNORE ME}. - enable_climate (Optional): When enabled, climate measurements from the optional climate module in the ISY994 will show up in Home Assistant as sensors. The default value is
True. - tls (Optional): This entry should reflect the version of TLS that the ISY controller is using for HTTPS encryption. This value can be either 1.1 or 1.2. If this value is not set, it is assumed to be version 1.1. This is the default for most users. ISY994 Pro users may likely be using 1.2. When using HTTPS in the host entry, it is best practice to set this value.
Once the ISY controller is configured, it will automatically import any binary sensors, covers, fans, lights, locks, sensors and switches it can locate.
Sensors
An Insteon door/window sensor will show up as a single Binary Sensor rather than two discrete devices like it does in the ISY994 admin panel. Note that when in “Two Nodes” mode, the sensor will have an UNKNOWN state until the sensor changes for the first time since the last Home Assistant reboot. If you do not use Insteon scenes that are controlled directly from the door sensor, you may prefer to set the sensor to “One Node” mode using the ISY Admin Panel.
Each Insteon leak sensor will also show up as a single Binary Sensor as opposed to the two nodes seen in the ISY994. The name of the device will be based on what the parent node is named in the ISY994, which is typically the one with “-Dry” at the end of the name. This may be confusing, because “On” means wet in Home Assistant. You can rename this node either in the ISY994 Admin Panel (which will change the entity_id in Home Assistant) or assign a friendly_name in the Customization section of your configuration.
If your leak or door/window sensor supports heartbeats, a new binary_sensor device will be added to Home Assistant to represent the battery state. The sensor will stay “Off” so long as the daily heartbeats occur. If a heartbeat is missed, the sensor will flip to “On”. The name of this device will be based on the heartbeat node in the ISY.
Handling Insteon Control Events
A Home Assistant isy994_control event is emitted for every “control” event in the Insteon network. This allows you to write automations that trigger based on Insteon button presses. You can also trigger off of the unique Insteon events, such as double-presses, long-holds etc.
automation:
  - alias: turn off living room on double tap lightswitch
    trigger:
      platform: event
      event_type: isy994_control
      event_data:
        entity_id: light.lr_track_lights_front
        control: 'DFOF'
    action:
      service: light.turn_off
      entity_id: light.lr_track_lights_rear
All isy994_control events will have an entity_id and control parameter in its event_data. You’ll need to refer to ISY994 documentation for the list of every possible control type, but the common ones are:
DON: On buttonDOF: Off buttonDFON: “Fast On”, usually from double-tapping an On buttonDFOF: “Fast Off”, usually from double-tapping an Off buttonFDUP: “Fade Up”, usually while holding down an On buttonFDDOWN: “Fade Down”, usually while holding down an Off buttonFDSTOP: “Fade Stop”, when releasing a long-held buttonBRT: “Brighten”, from controllers that issue a single command to slightly brighten a lightDIM: “Dim”, from controllers that issue a single command to slightly dim a light
Insteon Scenes
All Insteon scenes configured in the ISY994 will show up as switches in Home Assistant.
Creating Custom Devices
Using the Programs tab in the controller’s Administrative Console, custom devices can be created that will appear natively inside of Home Assistant. Home Assistant will scan the following folders and build the device to the associated domains:
My Programs
├── HA.binary_sensor
| ├── Movement In House
| | └── status
| └── Garage Open
| | └── status
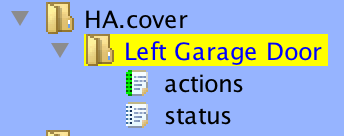
├── HA.cover
| ├── Left Garage Door
| | ├── actions
| | └── status
| ├── Living Room Blinds
| | ├── actions
| | └── status
├── HA.fan
| ├── Desk Fan
| | ├── actions
| | └── status
| ├── Living Room Fan
| | ├── actions
| | └── status
├── HA.lock
| ├── Front Door
| | ├── actions
| | └── status
| ├── Back Door
| | ├── actions
| | └── status
├── HA.switch
| ├── Dining Lights
| | ├── actions
| | └── status
| ├── Sleep Mode
| | ├── actions
| | └── status
A device is created by creating a directory, with the name for the device, under any of the following root directories:
- HA.binary_sensor will create a binary sensor (see Customizing Devices to set the sensor class)
- HA.cover will create a cover
- HA.fan will create a fan
- HA.lock will create a lock
- HA.switch will create a switch
A program, named status, is required under the program device directory. A program, named actions, is required for all program devices except for binary_sensor. Any other programs in these device directories will be ignored. The status program requires that you create a variable with the name of your choice. This variable will store the actual status of the new device and will be updated by the action program.
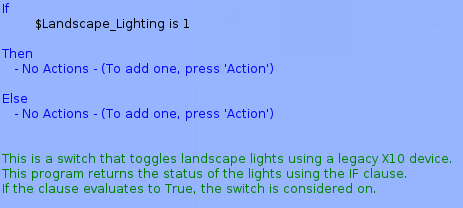
The status program in this directory is what indicates the state of the device:
- binary_sensor on if the clause returns true, otherwise off
- cover closed if the clause returns true, otherwise open
- fan on if the clause returns true, otherwise off
- lock locked if the clause returns true, otherwise unlocked
- switch on if the clause returns true, otherwise off
The actions program indicates what should be performed for the following device services:
- cover the THEN clause is evaluated for the open_cover service, the ELSE clause is evaluated for the close_cover service
- fan the THEN clause is evaluated for the turn_on service, the ELSE clause is evaluated for the turn_off service
- lock the THEN clause is evaluated for the lock service, the ELSE clause is evaluated for the unlock service
- switch the THEN clause is evaluated for the turn_on service, the ELSE clause is evaluated for the turn_off service
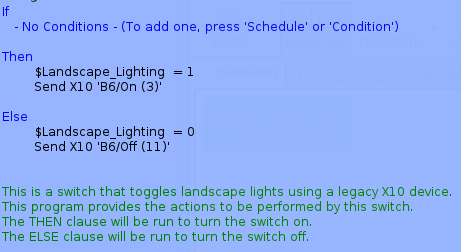
The example program above shows how to control a legacy X10 device from Home Assistant using an ISY controller.