Snips
The Snips Voice Platform allows users to add powerful voice assistants to their Raspberry Pi devices without compromising on privacy. It runs 100% on-device, and does not require an internet connection. It features Hotword Detection, Automatic Speech Recognition (ASR), Natural Language Understanding (NLU) and Dialog Management.
The latest documentation can be found here: Snips Platform Documentation.

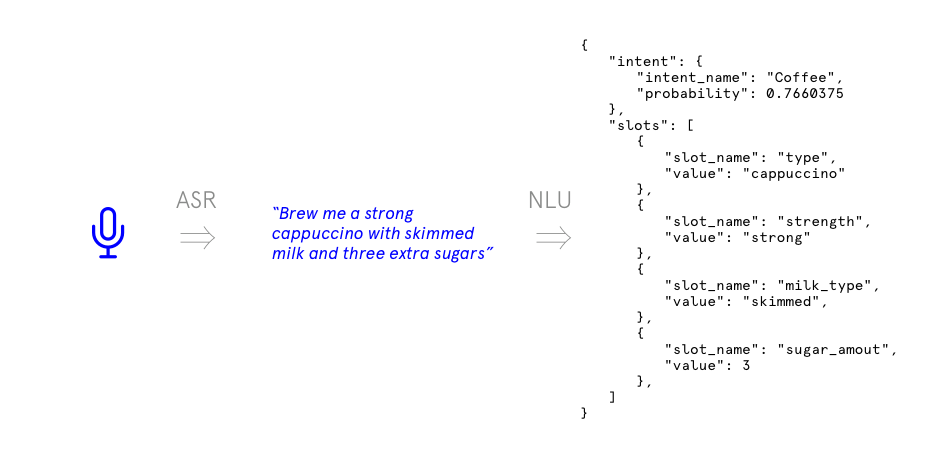
Snips takes voice or text as input and produces intents as output, which are explicit representations of an intention behind an utterance and which can subsequently be used by Home Assistant to perform appropriate actions.
The Snips Voice Platform
Installation
The Snips platform can be installed via the Snips APT/Debian repository. If you prefer to install the platform using the Docker distribution, check out our Docker Installation Guide.
$ sudo apt-get update
$ sudo apt-get install -y dirmngr
$ sudo bash -c  'echo "deb https://raspbian.snips.ai/$(lsb_release -cs) stable main" > /etc/apt/sources.list.d/snips.list'
$ sudo apt-key adv --keyserver pgp.mit.edu --recv-keys D4F50CDCA10A2849
$ sudo apt-get update
$ sudo apt-get install -y snips-platform-voice
Note: if the keyserver pgp.mit.edu is down try to use another one in the 4th line , like pgp.surfnet.nl:
sudo apt-key adv --keyserver pgp.surfnet.nl --recv-keys D4F50CDCA10A2849
Creating an assistant
Head over to the Snips Console to create your assistant. Launch the training and download by clicking on the “Download Assistant” button.
The next step is to get the assistant to work on your device. Unzip and copy the assistant folder that you downloaded from the web console to the path. Assuming your downloaded assistant folder is on your desktop, just run:
$ scp -r ~/Desktop/assistant pi@<raspi_hostname.local_or_IP>:/home/pi/.
Now ssh into your Raspberry Pi:
$ ssh pi@<raspi_hostname.local_or_IP>
By default, this command is ssh pi@raspberrypi.local, if you are using the default Raspberry Pi hostname.
Then, move the assistant to the right folder:
(pi) $ sudo mv /home/pi/assistant /usr/share/snips/assistant
Note: if you already have an assistant installed and wish to replace it, start by removing the previous one, and then move the new one in its place:
(pi) $ sudo rm -r /usr/share/snips/assistant
(pi) $ sudo mv /home/pi/assistant /usr/share/snips/assistant
Running Snips
Make sure that a microphone is plugged to the Raspberry Pi. If you are having trouble setting up audio, we have written a guide on Raspberry Pi Audio Configuration.
Start the Snips Voice Platform by starting the snips-* services:
$ sudo systemctl start "snips-*"
Snips is now ready to take voice commands from the microphone. To trigger the listening, simply say
Hey Snips
followed by a command, e.g.
Set the lights to green in the living room
As the Snips Platform parses this query into an intent, it will be published on MQTT, on the hermes/intent/<intentName> topic. The Snips Home Assistant component subscribes to this topic, and handles the intent according to the rules defined in configuration.yaml, as explained below.
Optional: specifying an external MQTT broker
By default, Snips runs its own MQTT broker. But we can also tell Snips to use an external broker by specifying this when launching Snips. In this case, we need to specify this in the /etc/snips.toml configuration file. For more information on configuring this, see the Using an external MQTT broker article.
Home Assistant configuration
Specifying the MQTT broker
Messages between Snips and Home Assistant are passed via MQTT. We can either point Snips to the MQTT broker used by Home Assistant, as explained above, or tell Home Assistant which MQTT broker to use by adding the following entry to the configuration.yaml file:
mqtt:
  broker: MQTT_BROKER_IP
  port: MQTT_BROKER_PORT
By default, Snips runs an MQTT broker on port 9898. So if we wish to use this broker, and if Snips and Home Assistant run on the same device, the entry will look as follows:
mqtt:
  broker: 127.0.0.1
  port: 9898
Alternatively, MQTT can be configured to bridge messages between servers if using a custom MQTT broker such as mosquitto.
Triggering actions
In Home Assistant, we trigger actions based on intents produced by Snips using the intent_script component. For instance, the following block handles a ActivateLightColor intent to change light colors:
snips:

intent_script:
  ActivateLightColor:
    action:
      - service: light.turn_on
        data_template:
          entity_id: light.{{ objectLocation | replace(" ","_") }}
          color_name: {{ objectColor }}
In the data_template block, we have access to special variables, corresponding to the slot names for the intent. In the present case, the ActivateLightColor has two slots, objectLocation and objectColor.
Special slots
In the above example, the slots are plain strings. However, when more complex types are used, such as dates or time ranges, they will be transformed to rich Python objects, for example:
SetTimer:
  speech:
    type: plain
    text: weather
  action:
    service: script.set_timer
    data_template:
      name: "{{ timer_name }}"
      duration: "{{ timer_duration }}"
      seconds: "{{ slots.timer_duration.value.seconds }}"
      minutes: "{{ slots.timer_duration.value.minutes }}"
      hours: "{{ slots.timer_duration.value.hours }}"
Sending TTS Notifications
You can send TTS notifications to Snips using the snips.say and snips.say_action services. Say_action starts a session and waits for user response, “Would you like me to close the garage door?”, “Yes, close the garage door”.
Service snips/say
| Service data attribute | Optional | Description |
|---|---|---|
text |
no | Text to say. |
site_id |
yes | Site to use to start session. |
custom_data |
yes | custom data that will be included with all messages in this session. |
Service snips/say_action
| Service data attribute | Optional | Description |
|---|---|---|
text |
no | Text to say. |
site_id |
yes | Site to use to start session. |
custom_data |
yes | custom data that will be included with all messages in this session. |
can_be_enqueued |
yes | If True, session waits for an open session to end, if False session is dropped if one is running. |
intent_filter |
yes | Array of Strings - A list of intents names to restrict the NLU resolution to on the first query. |
Configuration Examples
script:
  turn_on_light:
    sequence:
      service: script.turn_on_light
      service: snips.say
        data:
          text: 'OK, the light is now on'

automation:
  query_garage_door:
    trigger:
     - platform: state
        entity_id: binary_sensor.my_garage_door_sensor
        from: 'off'
        to: 'on'
        for:
          minutes: 10
    sequence:
      service: snips.say_action
        data:
          text: 'Garage door has been open 10 minutes, would you like me to close it?'
          intentFilter:
            - closeGarageDoor

# This intent is fired if the user responds with the appropriate intent after the above notification
intent_script:
  closeGarageDoor:
    speech:
      type: plain
      text: 'OK, closing the garage door'
    action:
      - service: script.garage_door_close