Actionable notifications
Actionable notifications allow you to attach 1-4 custom buttons to a notification. When one of the actions is selected Home Assistant will be notified which action was chosen. This allows you to build complex automations.
Examples of actionable notifications:
- A notification is sent whenever motion is detected in your home while you are away or asleep. You can add an action to Sound Alarm. When tapped, Home Assistant is notified that the
sound_alarmaction was selected. You can add an automation to sound the burglar alarm whenever this event is seen. - Someone rings your front door bell. You can send an action to lock or unlock your front door. When tapped, a notification is sent back to Home Assistant upon which you can build automations.
- Send a notification whenever your garage door opens with actions to open and close the garage.
 Actionable notifications allow the user to send a command back to Home Assistant.
Overview of how actionable notifications work
In advance of sending a notification:
- Define a notification category in your Home Assistant configuration which contain 1-4 actions.
- At launch iOS app requests notification categories from Home Assistant (can also be done manually in notification settings).
When sending a notification:
- Send a notification with
data.push.categoryset to a pre-defined notification category identifier. - Push notification delivered to device
- User opens notification.
- Action tapped
- Identifier of action sent back to HA as the
actionNameproperty of the eventios.notification_action_fired, along with other metadata such as the device and category name.
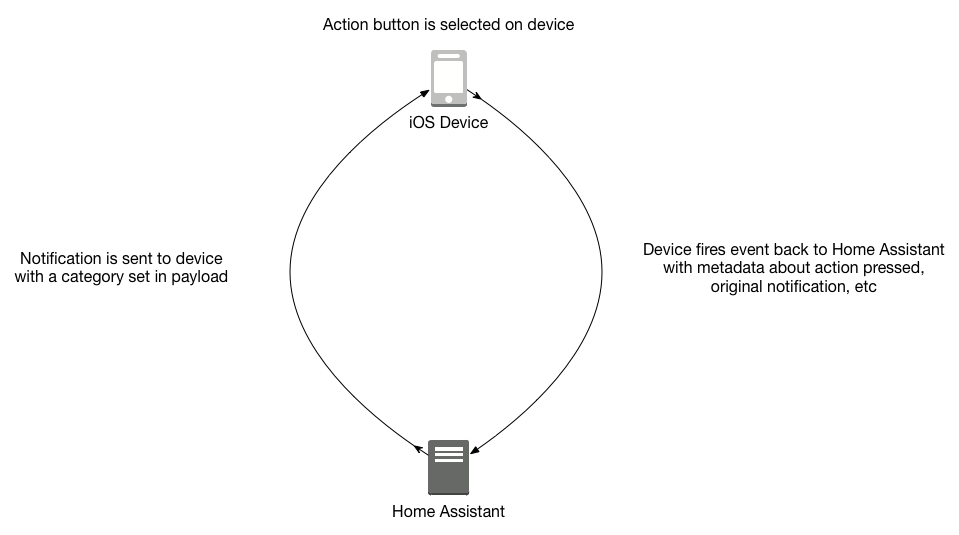 How the iOS device and Home Assistant work together to enable actionable notifications.
Definitions
- Category - A category represents a type of notification that the app might receive. Think of it as a unique group of actions.
- Actions - An action consists of a button title and the information that iOS needs to notify the app when the action is selected. You create separate action objects for distinct action your app supports.
Category parameters
- name (Required): A friendly name for this category.
- identifier (Required): A unique identifier for the category. Must be lowercase and have no special characters or spaces.
- actions (Required): A list of actions.
Actions parameters
- identifier (Required): A unique identifier for this action. Must be uppercase and have no special characters or spaces. Only needs to be unique to the category, not unique globally.
- title (Required): The text to display on the button. Keep it short.
- activationMode (Optional): The mode in which to run the app when the action is performed. Setting this to
foregroundwill make the app open after selecting. Default value isbackground. - authenticationRequired (Optional): If a truthy value (
true,True,yes, etc.) the user must unlock the device before the action is performed. - destructive (Optional): When the value of this property is a truthy value, the system displays the corresponding button differently to indicate that the action is destructive (text color is red).
- behavior (Optional): When
textInputthe system provides a way for the user to enter a text response to be included with the notification. The entered text will be sent back to Home Assistant. Default value isdefault. - textInputButtonTitle (Optional): The button label. Required if
behavioristextInput. - textInputPlaceholder (Optional): The placeholder text to show in the text input field. Only used if
behavioristextInputand the device runs iOS 10.
Here’s a fully built example configuration:
ios:
  push:
    categories:
      - name: Alarm
        identifier: 'alarm'
        actions:
          - identifier: 'SOUND_ALARM'
            title: 'Sound Alarm'
            activationMode: 'background'
            authenticationRequired: yes
            destructive: yes
            behavior: 'default'
          - identifier: 'SILENCE_ALARM'
            title: 'Silence Alarm'
            activationMode: 'background'
            authenticationRequired: yes
            destructive: no
            behavior: 'textInput'
            textInputButtonTitle: 'Silencio!'
            textInputPlaceholder: 'Placeholder'
Building automations for notification actions
Here is an example automation to send a notification with a category in the payload:
automation:
  - alias: Notify iOS app
    trigger:
      ...
    action:
      service: notify.ios_robbies_iphone_7_plus
      data:
        message: "Something happened at home!"
        data:
          push:
            badge: 5
            sound: <SOUND FILE HERE>
            category: "alarm" # Needs to match the top level identifier you used in the ios configuration
          action_data: # Anything passed in action_data will get echoed back to Home Assistant.
            entity_id: light.test
            my_custom_data: foo_bar
When an action is selected an event named ios.notification_action_fired will be emitted on the Home Assistant event bus. Below is an example payload.
{
  "sourceDeviceName": "Robbie's iPhone 7 Plus",
  "sourceDeviceID": "robbies_iphone_7_plus",
  "actionName": "SOUND_ALARM",
  "sourceDevicePushId": "ab9f02fe-6ac6-47b8-adeb-5dd87b489156",
  "textInput": "",
  "actionData": {}
}
Here’s an example automation for the given payload:
automation:
  - alias: Sound the alarm
    trigger:
      platform: event
      event_type: ios.notification_action_fired
      event_data:
        actionName: SOUND_ALARM
    action:
      ...
Notes:
textInputwill only exist ifbehaviorwas set totextInput.actionDatais a dictionary with parameters passed in theaction_datadictionary of thepushdictionary in the original notification.- When adding or updating push categories be sure to update push settings within the Home Assistant iOS app. This can be found within the app at Settings (gear icon) > Notification Settings.