Alarms, Sonos and iTunes now supported

two minutes reading time
  • Release-Notes
Comments

It’s like someone opened a can of rock solid developers and emptied it above our chat channel because it exploded with great conversations and solid contributions. Featured in release 0.7.3: Sonos, iTunes, Alarm component and Automation upgrade.

See GitHub for more detailed release notes.

Migration note: the scheduler component has been removed in favor of the automation component.

Sonos Sonos support has been added by @rhooper and @SEJeff. Home Assistant is now able to automatically detect Sonos devices in your network and set them up for you. It will allow you to control music playing on your Sonos and change the volume.

iTunes and airplay speakers @maddox has contributed support for controlling iTunes and airplay speakers. For this to work you will have to run itunes-api on your Mac as middleware.

# Example configuration.yaml entry
media_player:
  platform: itunes
  name: iTunes
  host: http://192.168.1.50
  port: 8181
Read on →

Remote Monitoring with Glances

two minutes reading time
  • How-To
Comments

Inspired by a feature requests I started looking into the available options to do monitoring of remote hosts. The feature request is about displaying system information in a similar way than the systemmonitor sensor does it for the local system. After a while I started to think that it would be a nice addition for a small home network where no full-blown system monitoring setup is present.

Read on →

Home Assistant meets IFTTT

two minutes reading time
  • How-To
  • Release-Notes
Comments

Today we announce the release of Home Assistant v0.7.2 which includes brand new support by @sfam to integrate with IFTTT. IFTTT stands for If This, Then That and is a webservice that integrates with almost every possible webservice out there. Adding Home Assistant to this mix means Home Assistant can connect with all via IFTTT.

It is now possible to disable your irregation system if it is going to be cloudy tomorrow or tweet if your smoke alarm goes off.

Head over to the setup instructions to get started with IFTTT. Click the read more button for some example recipes.

Read on →

Using MQTT with Home Assistant

eight minutes reading time
  • How-To
  • MQTT
Comments

MQTT support was added to Home Assistant recently. The MQTT component will enable you to do all sort of things. Most likely you will use it to communicate with your devices. But Home Assistant doesn’t care where the data is coming from or is limited to real hardware as long as there is MQTT support. This means that it doesn’t matter if the data is coming from a human, a web service, or a device.

A great example is shown in a Laundry Automation post in this blog.

This post will give you a small overview of some other possibilities on how to use MQTT with Home Assistant.

Read on →

0.7: Better UI and improved distribution

three minutes reading time
  • Release-Notes
Comments

As Home Assistant is gaining more and more users we started to feel the pain from not having a proper release mechanism. We had no version numbering and required users to checkout the source using Git to get started. On top of that, as the number of devices that we support keeps raising, so did the number of dependencies that are used. That’s why we decided to change the way we roll. From now on:

  • Each release will have a version number, starting with version 0.7. This was chosen because it shows that we have been around for some time but are not considering ourselves to be fully stable.
  • Each release will be pushed to PyPi. This will be the only supported method of distribution.
  • Home Assistant is available after installation as a command-line utility hass.
  • The default configuration location has been moved from config in the current working directory to ~/.homeassistant (%APPDATA%/.homeassistant on Windows).
  • Requirements for components and platforms are no longer installed into the current Python environment (being virtual or not) but will be installed in <config-dir>/lib.

A huge shout out to Ryan Kraus for making this all possible. Please make sure you read the full blog post for details on how to migrate your existing setup.

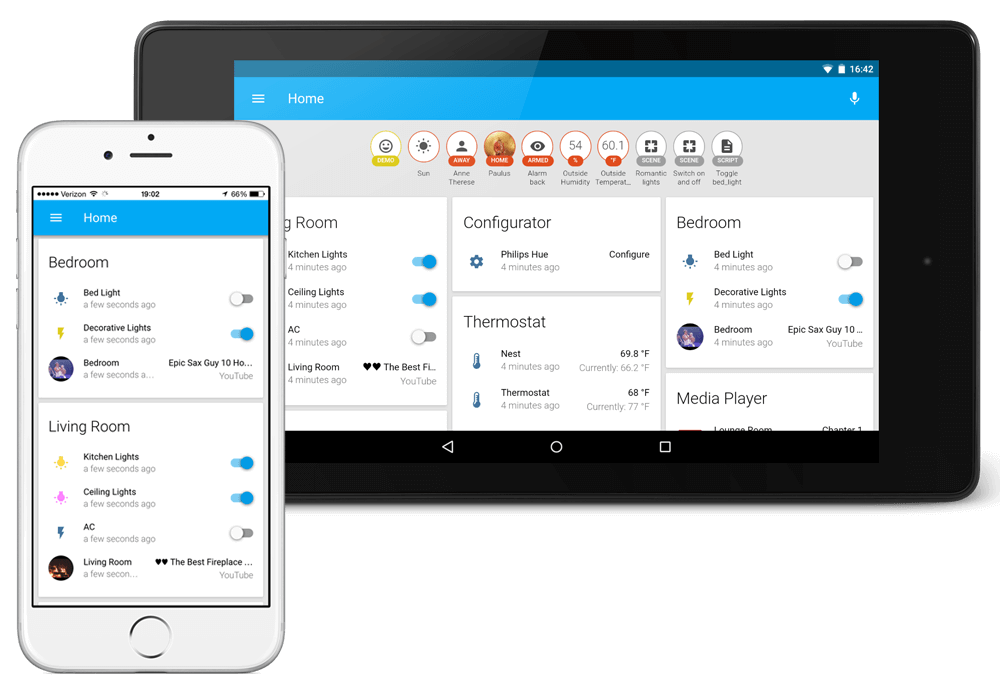
And while Ryan was fixing distribution, I have been hard at work in giving Home Assistant a face lift. We already looked pretty good but lacked proper form of organization for users with many devices. The new UI moves away from a card per entity and has cards per group and domain instead. The demo has been updated so give it a spin.

Screenshots of the new UI

Read on →

Laundry Automation: insight and notifications

five minutes reading time
  • User-Stories
Comments

This is a guest post by Home Assistant user and contributor Nolan Gilley.

In our house, laundry has been a struggle for quite some time. Our washer and dryer both lack a buzzer which leads to forgotten laundry, and stinky mess that needs to be rewashed. I decided to create a solution by monitoring the washer and dryer myself with some cheap electronics.

As an avid user of Home Assistant, I decided it would be the perfect application to manage the UI and notification system. Now all I needed was a way to monitor the washer and dryer. I tried using sound sensors but found them unreliable. I ended up opting for an accelerometer attached to the back of each appliance. I also added magnetic reed switches on the doors of the washer and dryer to detect if the doors are open or closed. I connected the accelerometers and reed switches to a Moteino, an arduino clone with an RF transceiver. The Moteino can perform the logic to figure out which state the appliances are in and wirelessly communicate that data with another Moteino that is connected via serial to my Raspberry Pi. The Raspberry Pi reads the serial data and repeats it over MQTT for Home Assistant to use. This is great because I don’t have to run Home Assistant on the Raspberry Pi. I can run it on a faster machine and point the MQTT component to my Raspberry Pi.

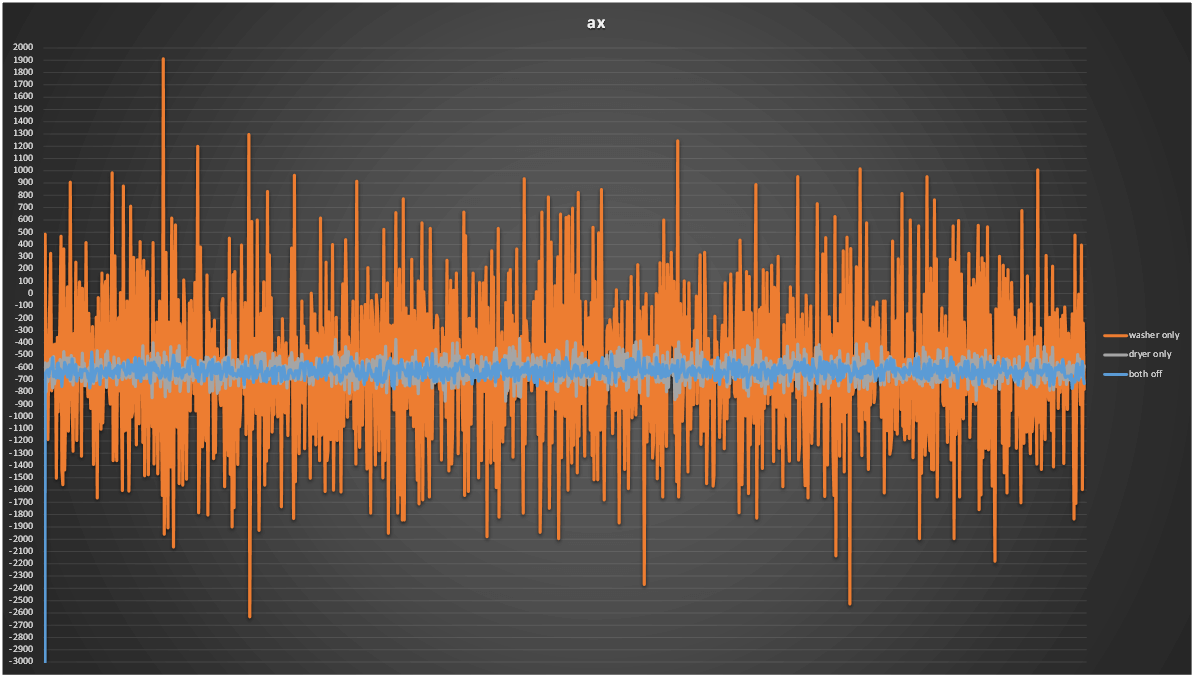
After taking some sample data from the accelerometers while each appliance was in operation, I decided to plot the data to help determine the proper thresholds of when the devices were running or off. I had to do this in order to get precise ranges so the dryer sensor wouldn’t get tripped by the washer or vice versa. In the plot below you can see the acceleration in the x direction for the accelerometer connected to the washing machine. It’s easy to see when the washing machine is in operation here. I used the same technique for the dryer’s accelerometer.

Graph showing the accelerometer data

Read on →

Verisure devices and modern TP-Link routers now supported

1 minute reading time
  • Release-Notes
Comments

A minor bug fix release to fix some issues that have come up since the last release. Please upgrade as soon as possible by running git pull from the Home Assistant directory.

This release is a major milestone in our test coverage as we’ve crossed into the 80s! It has to be noted that this covers mainly the core and automation components. Platforms that communicate with IoT devices have been excluded.

As we didn’t want to just push out bug fixes, this release includes a few additions:

  • Support for modern TP-Link routers like the ArcherC9 line has been contributed by @chrisvis.
  • Improved support for MQTT topic subscriptions has been contributed by @qrtn

Verisure Support Home Assistant support to integrate your Verisure alarms, hygrometers, sensors and thermometers has been contributed by @persandstrom.

# Example configuration.yaml entry
verisure:
  username: user@example.com
  password: password
  alarm: 1
  hygrometers: 0
  smartplugs: 1
  thermometers: 0

MQTT, Rasperry Pi, Logitech Squeezebox and ASUSWRT routers now supported

three minutes reading time
  • Release-Notes
Comments

It’s time for the August release and there is some serious good stuff this time. The core of Home Assistant has gone some serious clean up and a bump in test coverage thanks to @balloob. If you’re a developer, make sure you read up on the deprecation notices. @fabaff did another great round of documenting all the various components.

MQTT Support The big new addition in this release is the support for the MQTT protocol by @fabaff with some help from @balloob. It will now be possible to integrate any IoT device that talks via MQTT. For the initial release we support connecting Home Assistant to a broker (no TLS yet). Components can now subscribe and publish to MQTT topics (see the example) and also support for the automation component has been added. For more information, see the MQTT component page.

# Example configuration.yaml entry
mqtt:
  broker: IP_ADDRESS_BROKER
  # All the other options are optional:
  port: 1883
  keepalive: 60
  qos: 0
  username: your_username
  password: your_secret_password
Read on →

IP Cameras, Arduinos, Kodi and Efergy Energy Monitors now supported

four minutes reading time
  • Release-Notes
Comments

Another month has passed and some great new features have landed in Home Assistant. This month release has been made possible by balloob, ettisan, fabaff, gyran, jamespcole, michaelarnauts, miniconfig and rmkraus.

This release includes some architectural changes by me. The first is that the frontend is now based on a NuclearJS JavaScript backend. This has greatly helped to organize and optimize the frontend code. Another change is that Home Assistant will now install dependencies on-demand instead of installing dependencies for all supported devices.

IP Camera Support James has worked very hard to add support for IP cameras to Home Assistant which is included in this release. The initial release focusses on providing generic IP camera support. This means that any webcam that can exposes a JPEG image via a URL can be integrated.

Home Assistant will route the requests to your camera via the server allowing you to expose IP camera’s inside your network via the Home Assistant app.

# Example configuration.yaml entry
camera:
  platform: generic
  name: my sample camera
  username: MY_USERNAME
  password: MY_PASSWORD
  still_image_url: http://194.218.96.92/jpg/image.jpg

To update to the latest version, run scripts/update. Please report any issues on GitHub.

Read on →

Release notes for June 10, 2015

five minutes reading time
  • Release-Notes
Comments

Wow, almost a month has gone by since the last release and this release is packed. The biggest part of this release is probably one that you won’t notice: the frontend has been upgraded from Polymer 0.5 to the brand new released Polymer 1.0. Polymer has been declared stable by the Google overlords which will allow us to expand functionality that was waiting for this moment to arrive.

This release sets a record for the amount of people involved: 8! Andythigpen, Jamespcole, Azelphur, Fabaff, Dutchy-, Fbradyirl, wind-rider and ettisan, thanks a lot for your contributions!

A big improvement has been brought this release by wind-rider. He took the time to revive the Chromecast support and started improving the media player integration. This triggered other people to join in resulting in a revamped media player experience and support for the Music Player Daemon.

Example of the new media player cards

To update to the latest version, run scripts/update. Please report any issues on GitHub.

Read on →